The Dephion WorldSpace UIDocument
In today's entry of the Dephion community blog, we're going to take you with us on a deep dive into making the UI Toolkit's UIDocument compatible with WorldSpace rendering. The UI Toolkit has been available in Unity3d ever since 2020 and to this day, there is no "off-the-shelf" solution to support WorldSpace rendering. This leads to implementing a hybrid between "old" UGUI and new UI Toolkit User Interfaces, with double the maintenance costs and design efforts. But before we jump into the juicy bits, let's first explain the problem we are trying to solve.
UI-Heavy Applications
Here at Dephion, we mainly create applications in Unity3D that rely heavily on UI. We used to create UI in Unity3D with the UGUI solution; so a GameObject-based solution in a 2D canvas. This has been the default way of creating UI in Unity3D for a long time now.
However, there are some "problems" with this old approach:
- Creating responsive UGUI requires experience with UGUI specifically, there is no similar system like it. So "one does not simply create UGUI", you really need to dive deep into this system and know how the LayoutGroups work for example.
- Performance tuning can be a b*tch. Re-draws of the UI can become really expensive with complex UI. This leads to all kinds of nested canvasses to optimize for performance, which most definitely does not reduce technical debt.
- UI designs don't translate to UGUI. Our Art team uses design tools like Figma to design UI, which is pretty difficult to implement in UGUI with a 1-to-1 match. Theming is cumbersome to implement and test.
The Unity3D team tackled a lot of these issues by introducing the UI Toolkit back in 2020. The key takeaway is that this new system is based on web technology. So if you have prior experience designing web pages you can transfer that knowledge to design UI in Unity3D. This closes the gap between the Art team and the Unity3D teams that implement the UI since we should, in theory, be able to translate Figma designs to UI Toolkit directly. It also potentially means that the Art team themselves can create the UI and we, developers, simply write the code behind it. This could speed up the development pipeline greatly.
Unfortunately, there are of course some caveats to this approach as well like the UI Toolkit being in an early stage of development. This makes it lack a number of standard features you might expect from a UI framework. A very simple, yet annoying example of this is the input caret in an InputField being unresponsive or simple filters in an InputField for email addresses etc. This requires us to create lots of custom components for things that should be implemented by default (in our opinion).
Another shortcoming of the UI Toolkit is that WorldSpace rendering is unsupported. Interestingly, this has been debated quite a bit on Reddit which lead to someone posting this code on GitHub. So we had a bit of inspiration to get something working fast.
WorldSpace Rendering (and lack thereof)
UGUI provides users to put canvasses in WorldSpace RenderMode. This allows for 2D UserInterfaces to be rendered in 3D space. Common examples are markers in 3D space or maybe text balloons above 3D characters. In the UI Toolkit this is simply not supported. There is no way to render an UIDocument in 3D space.
This leads to us having a hybrid system where the 2D UI is rendered using the UI Toolkit, yet the 3D UI is rendered using UGUI. The main problem here is the inconsistency of the UI since we need to implement (some) things twice as we want one coherent UI in both 2D and 3D. An example of our usage of this hybrid system is shown in the image below:


There's a lot going on in this image. The UI Toolkit is used to render all the 2D UI like the bars at the top and bottom and the speech bubble. The 3D UI, however, is rendered by the old UGUI system. Fortunately, in this particular screenshot, there are no shared UI components between the 2D and 3D UI.
If we, for example, want a button with rounded edges (let's say 5 pixels) in both UI, we need to implement and maintain two different files. We also need to maintain two different theming systems. With UGUI we created our own system which relies on custom components (MonoBehaviours) that respond to events that are raised by some ThemeService. But with the UI toolkit we simply replace the theme in the PanelSettings and we are done. This is just one example of the cost of implementing new (UI) features and the maintenance thereof which is sluggish and not really cost-effective.
So... we wanted to solve this issue of WorldSpace rendering because it saves us not just a lot of time, but also the frustration of getting UI between UGUI and UI Toolkit implementation on a 1-to-1 match.
The solution
The solution was, in the end, pretty straightforward. It's simply a UIDocumented rendered on a RenderTexture which is displayed as the MainTexture on a 3D mesh, with a custom EventSystem. Say whut!? Let's unpack that a little bit.
A common practice to create real-time views in Unity3D applications is to use a so-called RenderTexture. A RenderTexture is a texture that allows for updates at run-time. This way game devs can implement features like mini-maps or a rear-view mirror in a racing game for example. An interesting aspect of the UI Toolkit’s UIDocument is that it supports rendering on such texture, and thus this opens the door to project it anywhere a texture can be rendered.
To render something in 3D we need some kind of 3D object. Luckily, Unity3D provides quick utility functions for creating primitive shapes like cubes, spheres or cylinders. However, since we want to render the UI on a flat surface we need either a plane or a quad. For our solution, a quad is more than sufficient. The difference between a quad and a plane is that a quad only has 2 triangles (polygons), and a plane has far more. In the image below you can see the obvious difference.

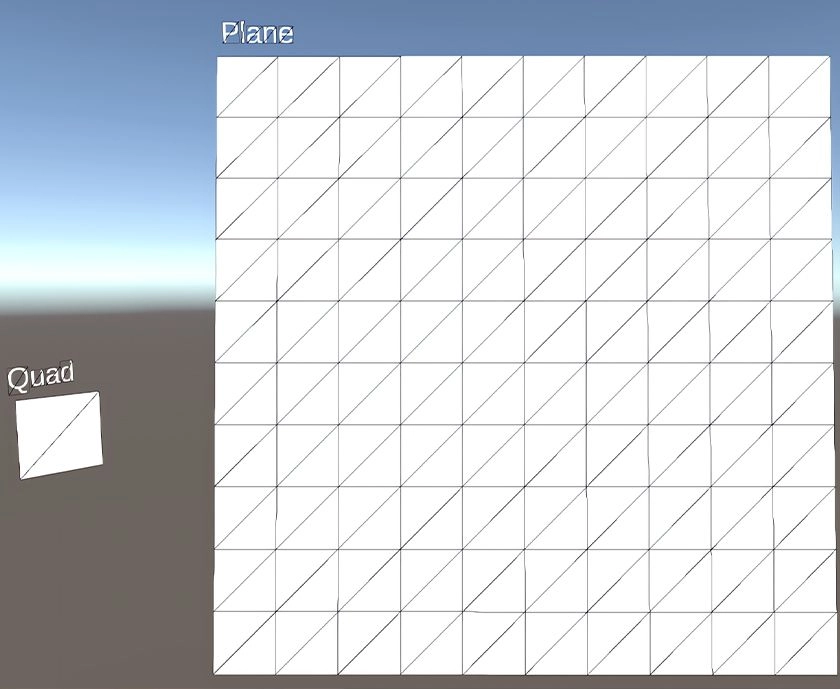
Although the performance implications of both shapes are rather minimal, taking the Quad is most definitely more performant. And if you can make such a simple approach to squeeze out just that tiny bit of performance, we ought to take it.
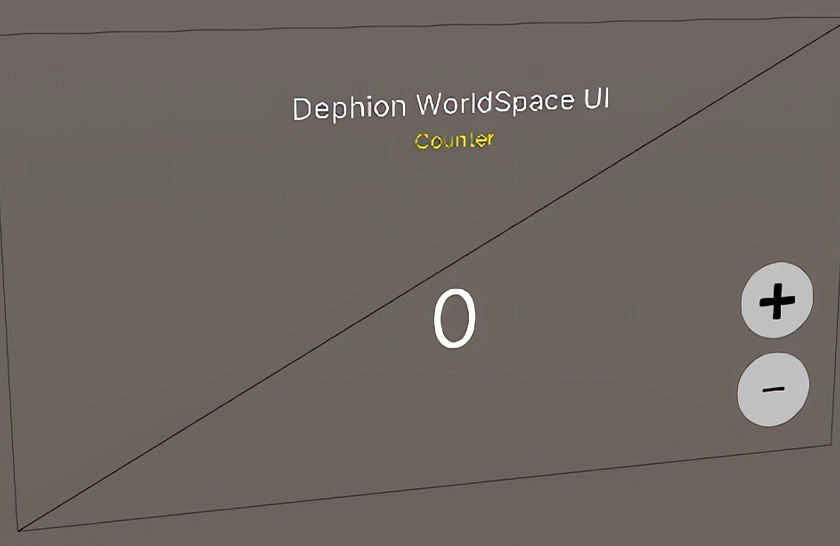
With minimal effort, we can now render the UI on a quad like in the image below.

  /// <summary>
        /// Create the Canvas Mesh
        /// </summary>
        private void CreateCanvas()
        {
            var meshFilter = gameObject.AddComponent<MeshFilter>();
            MeshRenderer = gameObject.AddComponent<MeshRenderer>();
            MeshRenderer.sharedMaterial = null;
            MeshRenderer.shadowCastingMode = ShadowCastingMode.Off;
            MeshRenderer.receiveShadows = false;
            MeshRenderer.allowOcclusionWhenDynamic = false;
            MeshRenderer.lightProbeUsage = LightProbeUsage.Off;
            MeshRenderer.reflectionProbeUsage = ReflectionProbeUsage.Off;
            MeshRenderer.motionVectorGenerationMode = MotionVectorGenerationMode.ForceNoMotion;

            var quad = GameObject.CreatePrimitive(PrimitiveType.Quad);
            meshFilter.sharedMesh = quad.GetComponent<MeshFilter>().sharedMesh;
            gameObject.AddComponent<MeshCollider>().sharedMesh = meshFilter.sharedMesh;
            Destroy(quad);
        }

        /// <summary>
        /// Setup the world canvas material
        /// </summary>
        private void SetupMaterial()
        {
            if (PanelSettings.colorClearValue.a < 1.0f)
                Material = new Material(Shader.Find("Unlit/Transparent"));
            else
                Material = new Material(Shader.Find("Unlit/Texture"));

            Material.SetTexture("_MainTex", RenderTexture);
            _mainTexture2D = Material.mainTexture as Texture2D;
            MeshRenderer.sharedMaterial = Material;
        }

        /// <summary>
        /// Generate the UI (toolkit) Document
        /// </summary>
        private void AddUiDocument()
        {
            UiDocument = gameObject.AddComponent<UIDocument>();
            UiDocument.panelSettings = PanelSettings;
            UiDocument.visualTreeAsset = _visualTreeAsset;
        }

        /// <summary>
        /// Create panelSettings
        /// </summary>
        /// <param name="renderTexture">Render texture to project the UI on</param>
        /// <returns>Panel Settings</returns>
        private PanelSettings CreateWorldPanelSettings(RenderTexture renderTexture)
        {
            PanelSettings = Instantiate(_panelSettingsPrefab);
            PanelSettings.targetTexture = renderTexture;
            PanelSettings.clearColor = true;
            PanelSettings.scaleMode = PanelScaleMode.ConstantPixelSize;
            PanelSettings.scale = _panelScale;
            PanelSettings.name = $"PanelSettings {name}";
            renderTexture.name = $"RenderTexture {name}";
            return PanelSettings;
        }

        /// <summary>
        /// Create a new render texture
        /// </summary>
        /// <returns></returns>
        private RenderTexture InstantiateRenderTexture()
        {
            RenderTextureDescriptor textureDescriptor = _renderTexturePrefab.descriptor;
            textureDescriptor.width = _panelWidth;
            textureDescriptor.height = _panelHeight;
            return new RenderTexture(textureDescriptor);
        }

        /// <summary>
        /// Scale the mesh according to the given resolution
        /// </summary>
        protected void RefreshPanelSize()
        {
            if (RenderTexture != null && (RenderTexture.width != _panelWidth || RenderTexture.height != _panelHeight))
            {
                RenderTexture.Release();
                RenderTexture.width = _panelWidth;
                RenderTexture.height = _panelHeight;
                RenderTexture.Create();

                if (UiDocument != null)
                    UiDocument.rootVisualElement?.MarkDirtyRepaint();
            }

            transform.localScale = new Vector3(_panelWidth / _pixelsPerUnit, _panelHeight / _pixelsPerUnit, 1.0f);
            _resolution = new Vector2(_panelWidth, _panelHeight);
        }
The next step is to be able to register input. What's the use of a UI without input anyway!? So in order the register actions like clicks or taps (for mobile) and drags there needs to be some kind of EventSystem. It took us quite a while to find an easy and performant solution for this since the registering of input in the UI Toolkit is encapsulated in lots of private/protected/internal interfaces and classes. We could of course access all of this using reflection but that would tank the performance big time, not to mention unsupported reflection magic with IL2CPP -- especially since Dephion will mainly use this in mobile apps. Thus, we needed to find a different solution.
To fix it we implemented a very simple RayCaster, which checks if the top object (with the least distance) has a WorldSpaceUI component. If so, we take the RaycastHit TextureCoord and we feed it into our event system. This way, we know exactly where the user clicked on the mesh, and based on this position we are able to determine IF the user actually clicked something of interest on the WorldSpaceUI. We then feed this information into the default UI Toolkit PanelEventHandler and voila, we have input! (We can't seem to find docs about the PanelEventHandler class)
if (Physics.RaycastNonAlloc(ray, _hits, _maxRaycastDistance) > 0)
            {
                ISelectable currentlySelected = null;
                foreach (var hit in _hits.Where(h => h.collider).OrderBy(h => h.distance))
                {
                    if (hit.collider.gameObject.TryGetComponent<WorldSpaceUIDocument>(out var doc))
                    {
                        currentlySelected = doc.PickTopElement(hit, out var hitPos);
                        currentHitPosition = hitPos;
                        if (currentlySelected != null)
                            break;
                    }
                }
             }
Now we finally have a working 3D UI document and are thus able to create one coherent UI across 2D and 3D space. Awesome, right!?
But, there's always a but... after some testing we quickly found out that, although it works, it does not support "clicking through" transparent areas. Since we RayCast onto a MeshCollider, we don't actually know what we clicked, we just feed that position into the UI Toolkit PanelEventHandler.
The image below showcases this exact problem (we enabled "Convex" mode on the MeshCollider of the UI to emphasize the colliders):


Fixing this was quite a mission. As mentioned before, we did not want to commit the crime of using run-time reflection to achieve our goals. With the current solution, we use the default PanelEventHandler to process the position of the input. But of course, the collider is not permitting the 2D Physics RayCaster to click through the collider in the front. And thus, we are unable to click the buttons in the UI that's rendered in the back.
However, to fix this we are required to reimplement or re-engineer most of the UI Toolkits PanelEventHandler and EventSystem to get functions like hover, clicks, drags and other controls. This is a disadvantage we are willing to take and invest time in.
The solution was found after long debugging sessions and decompiling the UI toolkit source code. An interface called "IPanel", which is implemented by the UIDocument, exposes a public function called "Pick". This function basically traverses the entire VisualTree, in a recursive fashion, and checks if some position is inside the bounding box of VisualElements.
We reimplemented this function, as a nice Extension Method to the IPanel interface to check whether we actually clicked anything on the canvas, if not we take the next RayCastHit that has a WorldSpaceUI document and repeat the action there. We do this until we hit something. (The method below, can most likely still be optimized!)
 /// <summary>
        /// recursive picking function
        /// </summary>
        /// <param name="root">root visual element</param>
        /// <param name="point">position</param>
        /// <param name="picked">list of picked elements</param>
        /// <returns>new root element</returns>
        private static VisualElement PerformPick(
            VisualElement root,
            Vector2 point,
            List<VisualElement> picked = null)
        {
            if (root.resolvedStyle.display == DisplayStyle.None || root.pickingMode == PickingMode.Ignore && root.hierarchy.childCount == 0)
                return (VisualElement)null;
            Vector2 local = root.WorldToLocal(point);
            bool flag = root.ContainsPoint(local);

            VisualElement visualElement1 = (VisualElement)null;
            for (int key = root.hierarchy.childCount - 1; key >= 0; --key)
            {
                VisualElement visualElement2 = PerformPick(root.hierarchy[key], point, picked);
                if (visualElement1 == null && visualElement2 != null)
                {
                    if (picked == null)
                        return visualElement2;
                    visualElement1 = visualElement2;
                }
            }

            if (((!root.visible ? 0 : (root.pickingMode == PickingMode.Position ? 1 : 0)) & (flag ? 1 : 0)) != 0)
            {
                picked?.Add(root);
                if (visualElement1 == null)
                    visualElement1 = root;
            }

            return visualElement1;
        }
So by redirecting this function to one of our own we are now able to detect if a user clicks on something transparent or not.
This finally completes the circle and we have something that actually works. We also ran some benchmarks to check whether this solution is actually useful and we were able to run about 200 documents with 30FPS on a beefy windows device. This might not sound that impressive, but we don’t expect we would need this many WorldSpace UI documents.
The main gains here are the following:
- Support for one coherent UI across 2D and 3D space.
- Improved development pipeline because we can translate Figma designs easier.
- Reduced implementation and maintenance costs
- All kinds of new awesome features like being able to drag or animate elements from one canvas to another in 3D space. To check out the code, go to our GitHub and use it, play it, love it. You can leave a comment if you like or have feature requests. We might actually implement it!
I hope you liked this blog and see you next time;
The Dephion Unity Team.